The installation method of a commercial site furnishing product is determined when a specific product is selected. There are typically two options to select from – in-ground and surface mount.
We’ll look at each of these installation methods in more detail. As well as provide step-by-step instructions for each.
Note: The information in this post is meant to provide a general understanding of common installation methods for site furnishings. Please refer to the documentation that accompanies your product for specific installation instructions.
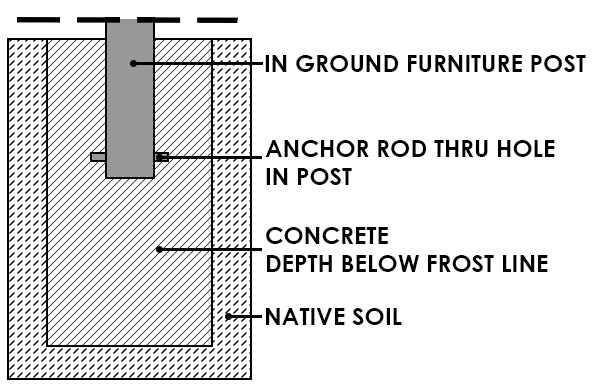
In-ground Post Installation
This installation method involves creating a hole in the surface where the product will be installed, inserting the post and then encasing the post in concrete. For example, this would be used for an in ground bench installation, or for tables or seats where the post will be mounted below the surface.
Most often, an in-ground post mounting method would be chosen when placing the site furniture in a new area where an existing concrete slab does not exist.
Like natural soil surfaces, for example.
In-ground Post Installation Instructions
Materials List
- Shovel or another tool to dig out a hole
- Anchor rods (supplied by Thomas Steele along with product)
- Object or framework to suspend fixture
- Concrete
- Level
Installation Instructions
1. Prepare a hole for each post that is to be mounted. Minimally it will be 6 inches in diameter. Larger diameter holes will be required for furniture that have greater leverage.
Refer to the manufacturer’s installation instructions for specific hole size needed.
The hole will then need to be dug below the appropriate frost level depth of the climate.
2. Insert the anchor rods provided by the manufacturer into the holes at the bottom of the in-ground post.
NOTE: If the fixture includes a grout cover, slide it on and temporarily tape it high so it is out of the way.
3. Insert in ground posts into hole(s). See product instructions for proper mounting depth.
Furniture should be installed so the seat is 17 1/2 to 18 inches above the finished grade.
Detached tables should be installed so the top is 30 inches above the finished grade.
4. Suspend the fixture so that it is plumb and properly oriented in the hole.
5. Pour the concrete into the hole(s). Allow to set.
Surface Mount Installation
A surface mount installation is preferred when installing site furnishings on existing concrete surfaces.
This installation method involves drilling holes into an existing concrete slab. Anchors are then inserted into the hole in the concrete and bolts extend through a hole in the flange on the foot of the site furnishing.
Surface Mount Anchors
The specific installation method you use will be determined by the anchor type you select.
There are three common anchors used with surface mount installations – wedge, drop-in and spike.
The primary differentiation for when each anchor should be used is based on the permanence of the installation and the surface material.
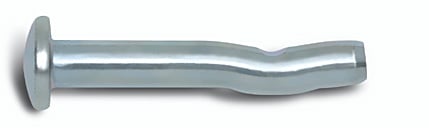
Wedge Anchors
A wedge anchor is a single element that is inserted into the hole in the concrete with the male, threaded portion extending above the concrete. A nut is used to tighten the fixture to the surface.
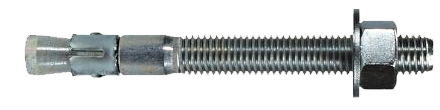
This installation method is best used with solid concrete surfaces.
The main benefit of a wedge anchor is that provides the opportunity for the site furnishing to be easily uninstalled and moved. The nut of a wedge anchor can be removed with common hand tools.
If the furniture will be removed and the anchor no longer needed, the portion of the wedge anchor above the concrete can be sawed off.
The wedge anchor can also be pounded into the concrete. But the hole will need to be drilled two times the length of the anchor before installing the wedge anchor.
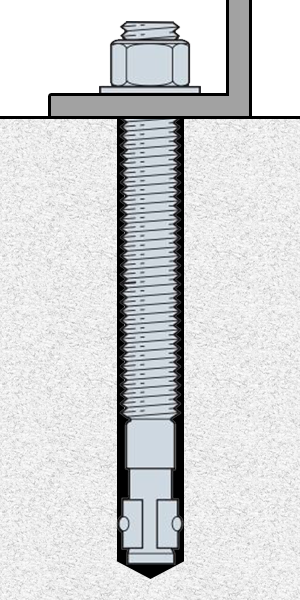
Drop-in Anchors
A drop-in anchor involves an anchor element that is placed into the hole in the concrete. A separate bolt is then inserted into the anchor. A nut is used to tighten the fixture to the surface.
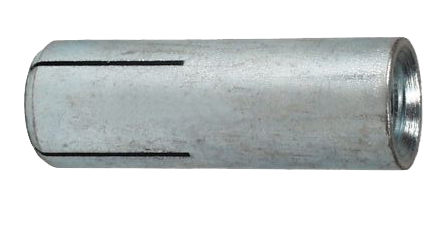
The bolt simply unscrews from the anchor, which is level with the material. Leaving a flat surface.
Spike Anchors
A spike anchor is a single, solid object inserted into the hole in the concrete. Because of its shape, it remains lodged in the concrete.
This installation works with solid concrete surfaces.
This anchor is much more difficult to remove. The concrete surrounding the anchor will need to be chipped away to remove and uninstall the furniture.
Because the installation process involves hammering these anchors onto the furniture, they often damage the furniture. It is not recommended that these anchors be used for most site furnishing installations.
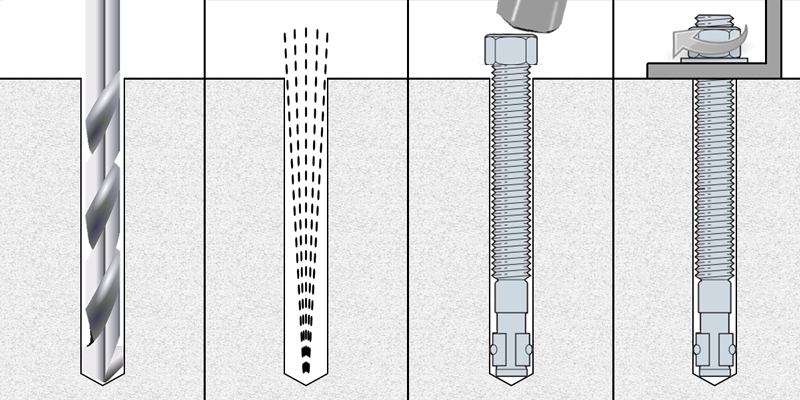
Wedge Anchor Installation Instructions
Materials List
- Hammer drill
- Carbide tipped drill bit
- Wedge anchors
- Hammer
- Wrench
- Safety glasses
Installation Instructions
1. Determine correct wedge anchor length. Do this by adding minimum embedment depth – defined by the diameter of the wedge anchor being used – and material thickness of flange on site furnishing footing.
For example, a 3/8” wedge anchor with a minimum embedment depth of 1-1/4” should be drilled 1-5/8” at a minimum.
It’s suggested the hole actually be drilled an additional 1” to account for dust that will settle into the hole. Or double the anchor length to allow the option for the anchor to be pounded fully into the hole.
2. Place furniture in the desired installation spot. Mark locations of holes by marking through the mounting holes in the flange.
3. Move furniture off installation spot.
4. Drill holes using drill bit the same diameter as wedge anchor.
5. Blow out or remove as much concrete dust from the hole as possible.
6. Insert wedge anchors into the holes in the concrete.
7. Place nut on wedge anchor to protect threads during installation.
8. Hammer wedge anchor into hole deep enough so that threads are below surface of base material.
9. Remove nuts.
10. Place furniture back in desired location, threading anchor through holes in flanges.
11. Place washer on anchors, then nuts. Tighten nuts turning approximately three or four full turns.
Drop-in Anchor Installation Instructions
Materials List
- Hammer drill
- Carbide tipped drill bit
- Wedge anchors
- Hammer
- Wrench
- Safety glasses
1. Place furniture in the desired installation spot. Mark locations of holes by marking through the mounting holes in the flange.
2. Move furniture off installation spot.
3. Drill holes using a 3/4" drill bit for a 1/2" anchor. Or a 5/8” drill bit for a 3/8” anchor.
CAUTION: Oversized holes will make it difficult to set the anchor and will reduce the anchor's load capacity.
4. Blow out or remove as much concrete dust from the hole as possible.
5. Insert cone end of anchor into hole and tap flush to surface.
6. Place furniture back in desired location. Insert bolt through holes in flanges and into anchor.
Note: The anchor should engage a minimum of 2/3 of the bolt threads.
7. Place nut on bolt and tighten.
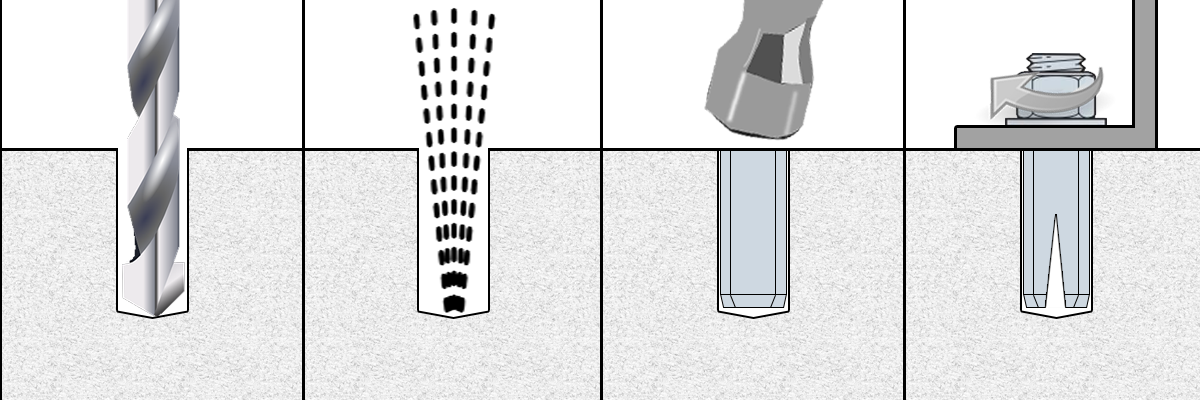
The anchor can also be expanded using a Hollow-Set Tool. If Hollow-Set Tool is used, thread anchor onto tool prior to tapping into anchor hole. When flush with surface, turn tool clockwise to tighten.
Release tool from set anchor by turning counterclockwise. Fixture can then be attached.
Note: Always make sure to wear appropriate safety equipment and following any safety instructions from manufacturer when installing anchors.